
Key Takeaways
Get the bleed right before you upload, and you will avoid the most frustrating part of ordering print. There is nothing worse than getting something back that looks nothing like what you designed.
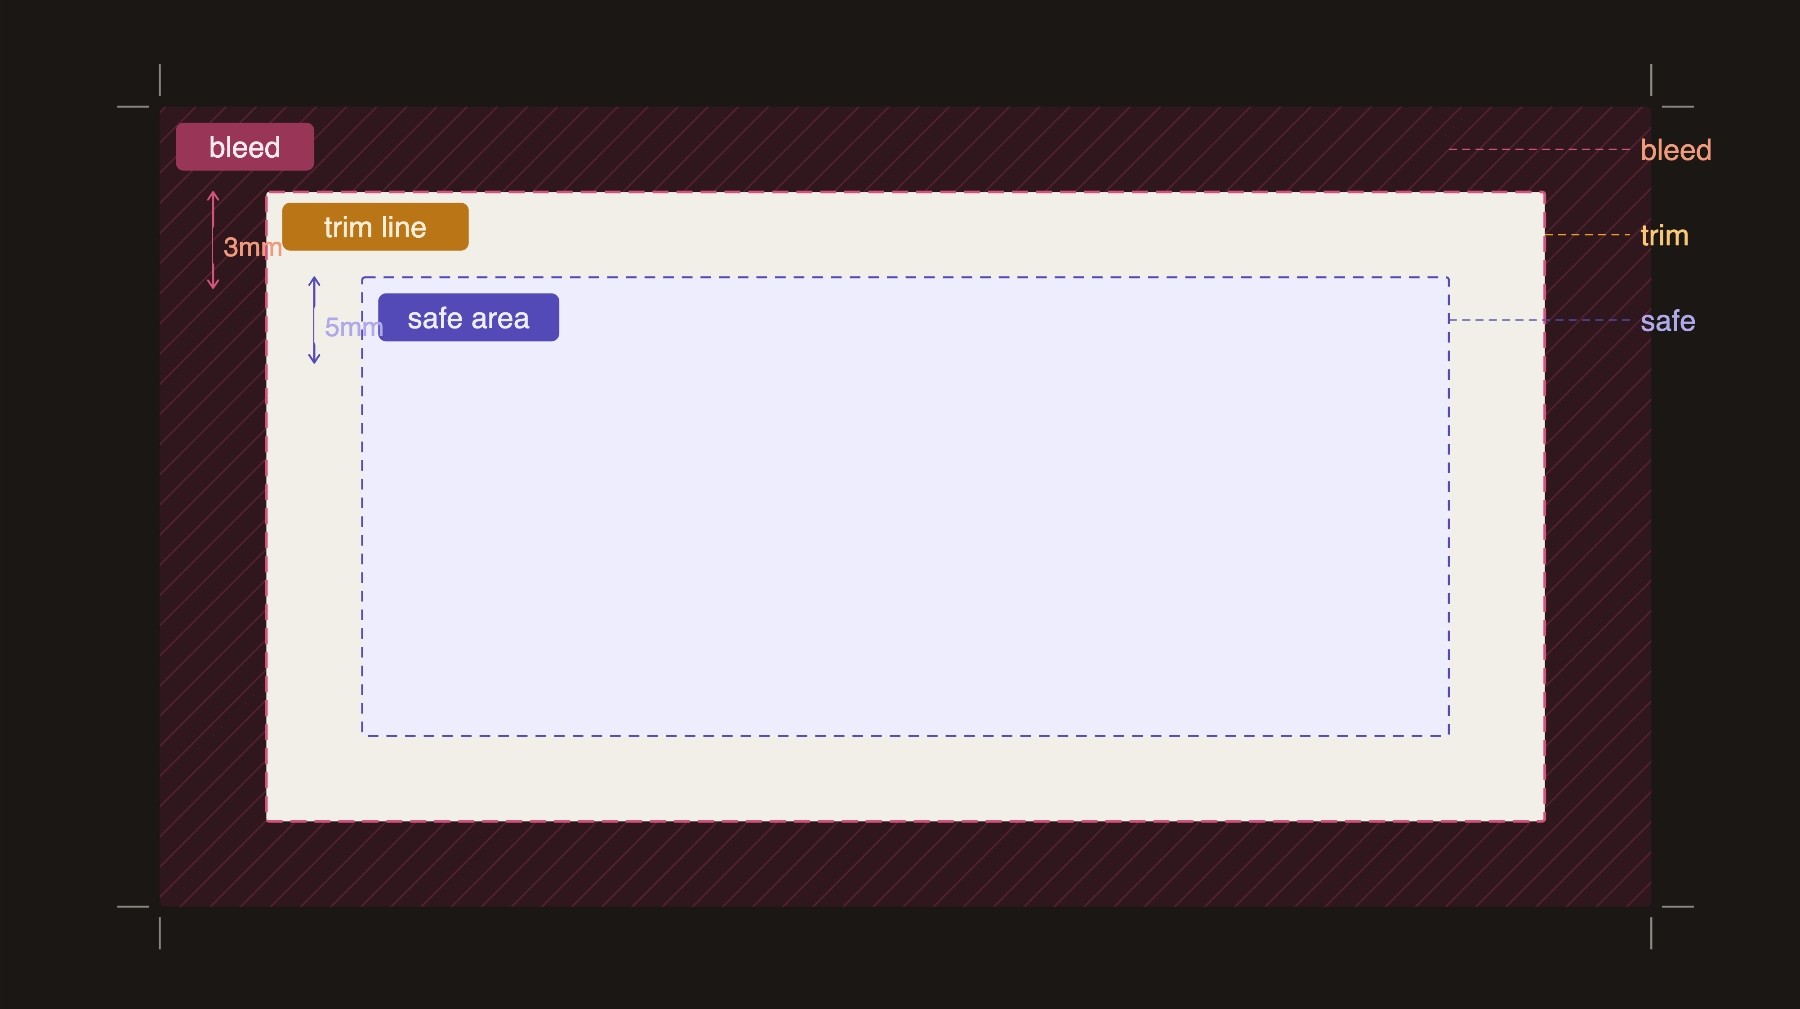
- Bleed is the extra artwork beyond the trim line. Standard is 0.125 inches on all four sides. It exists because cutters are not perfect, and that small buffer keeps white edges from showing up on your finished piece.
- There are three zones in every print file. Bleed area, trim line, and safe zone. Each one does a different job, and ignoring any of them causes problems.
- Your safe zone is where important stuff lives. Text, logos, phone numbers. Keep them at least 0.125 inches inside the trim line or you risk getting them clipped.
- Canva, Illustrator, and InDesign all handle bleed differently. Canva does it at export, not setup, which is where most people get tripped up.
- If you forgot bleed, it is usually a quick fix. Extend your background to the bleed line, re-export with the right settings, and you are good to go.
You spent real time on your design. The colors are right, the layout is clean, and everything looks exactly the way you want it on screen.
Then your order arrives, and there it is. A thin white sliver running along one edge, where your background color should be.
That is a bleed problem. It is one of the most common print issues we see, and it is almost entirely preventable once you understand what bleed actually is and why printers need it.
This guide breaks it down in plain language, whether you are a designer setting up files for a client, a small business owner ordering business cards for the first time, or a realtor putting together a marketing piece.
What Is Bleed in Printing?
Bleed is the extra portion of your artwork that extends beyond the final trim size of your printed piece. Most commercial printers require 0.125 inches, about 3mm, of bleed on every side.
Think of it like painting a wall all the way into the corner rather than stopping right at the edge. You go a little past where you need to, so that when everything is said and done, there are no gaps.
That extra 0.125 inches is never meant to be seen. It gets cut off. Its only job is to make sure that if the cutter lands even slightly off target, your background color or image still fills the entire printed surface with no white paper showing through.
Why Printers Need Bleed
Commercial printing involves large sheets of paper that get cut down to the final product size after printing. Industrial cutters are precise, but not perfect.
There is always a small amount of natural variance in where the blade lands, sometimes a fraction of a millimeter in any direction.
That variance is normal and expected. Bleed accounts for it. When your artwork extends past the trim line, a slightly imperfect cut still produces a finished piece that looks exactly right.
Without bleed, that same tiny variance exposes raw white paper along the edge of your design.
What Happens When You Do Not Include Bleed
The most common result is a white border along one or more edges of your finished piece. Even though your design had a full color background.
You might also see inconsistent edges where one side looks fine while another has a visible gap.
On smaller products like business cards, this is especially noticeable. On larger format products like banners or posters, a missing bleed can mean a visible strip of unprinted material along an edge that should be seamless.
Bleed, Trim, and Safe Zone: What Is the Difference?
These three terms come up in almost every print file conversation, and they are easy to mix up. Here is a plain language breakdown of each one.
Bleed
The bleed area is the zone outside the trim line where your background colors, images, and textures should extend. Standard bleed is 0.125 inches on all sides. Nothing important should live here because it will be cut off.
Trim
The trim line is not a visible part of your design. It is a guide that tells the cutter where to cut. When you set up a document at 3.5 x 2 inches for a business card, you are defining the trim line.
Your artwork fills the document and extends 0.125 inches past it on all sides for bleed.
Safe Zone
Cuts can drift slightly inward just as easily as they drift outward. If your phone number sits right at the edge of the trim line, an inward drift clips it.
The safe zone exists to give the cutter room to be slightly off without affecting what matters. Think of it as a buffer you set up once and never have to think about again.
Standard Bleed Sizes for Common Print Products
The 0.125 inch standard covers most print products. Here are the specs for the products Print Cartel customers order most often.
- Business cards (3.5 x 2 in): 0.125 in bleed on all sides
- Postcards 4x6 (4 x 6 in): 0.125 in bleed on all sides
- Postcards 6x9 (6 x 9 in): 0.125 in bleed on all sides
- Flyers 5.5x8.5 (5.5 x 8.5 in): 0.125 in bleed on all sides
- Flyers 8.5x11 (8.5 x 11 in): 0.125 in bleed on all sides
- Brochures (varies by fold): 0.125 in bleed on all sides
- Rack cards (4 x 9 in): 0.125 in bleed on all sides
- Retractable banners (varies): 0.5 in bleed on all sides
For large format products like banners and pop up displays, bleed requirements are larger, often 0.5 inches or more, because cutting variance is greater at scale.
If you are ordering business cards, our guide to the different types of business cards covers sizing and setup details for specialty options like painted edge and oversized cards.
For postcards, our postcard size guide walks through dimensions for every standard size.
Working on a brochure? Check out our breakdown of the different types of brochure folds to confirm your trim dimensions before you set up your file.

How to Set Up Bleed in Your Design File
Every major design tool supports bleed. The process is a little different in each. Canva trips people up more than the others because it handles bleed at export rather than at the document setup stage.
Here is how to do it correctly in the three tools Print Cartel customers use most.
Setting Up Bleed in Canva
- Set up your document at the exact trim size, 3.5 x 2 inches for a business card, for example.
- Do not try to manually add bleed by making your canvas larger. Canva handles it at export.
- Fill the entire canvas with your background color or image before you download.
- When you are ready to download, select PDF Print as the file format.
- Check the box that says "Crop marks and bleed." Canva automatically adds 0.125 inches of bleed to your export.
Canva Design Tip: If there is any white space between your background and the canvas edge, Canva exports that white space as bleed instead of your design. Always fill the entire canvas first.
For more information, read our blog on how to print from Canva. It covers export settings in more detail.
Setting Up Bleed in Adobe Illustrator
- Go to File > Document Setup and enter 0.125 inches in each of the four bleed fields.
- A red border will appear around your artboard. That is your bleed line.
- Extend your background artwork all the way to that red border.
- When you are ready to export, go to File > Save As > Adobe PDF.
- In the Marks and Bleeds panel, check "Use Document Bleed Settings." That locks in everything you already set up.
Setting Up Bleed in InDesign
InDesign gives you the most control of the three, which is part of why it is the preferred tool for multi page print work.
- When creating a new document, look for the Bleed and Slug section at the bottom of the setup dialog.
- Enter 0.125 inches on all four sides.
- A red bleed border will appear around your page, same concept as Illustrator.
- Extend your background to that red border.
- When exporting to PDF, open the Marks and Bleeds panel in the export dialog.
- Select "Use Document Bleed Settings."
Common Bleed Mistakes and How to Avoid Them
Most bleed problems come down to one of five things. Some are setup issues, some are export issues, and one is surprisingly easy to miss even after years of sending files to print.
- Not extending the background to the bleed line: Your document has bleed set up correctly, but your background color or image stops at the trim line instead of reaching the bleed border. This is the most common mistake by a wide margin. Always drag your background elements out to the red bleed line before you export.
- Placing text or logos too close to the trim line. If your phone number or logo sits right at the edge of the trim line, a normal amount of cutter variance can clip it. Keep everything important at least 0.125 inches inside the trim, inside the safe zone.
- Using low resolution images in the bleed area. A low resolution image that extends into the bleed zone will look blurry in the finished print. Keep images at 300 DPI at full document size, bleed area included.
- Exporting without bleed turned on. This one catches people who set everything up perfectly and then skip the export step. Always check "Use Document Bleed Settings," or the Canva equivalent, before you upload. A correctly set-up file exported without bleed is the same as a file with no bleed at all.
- Forgetting bleed on all four sides. It is easy to remember left and right but forget top and bottom. Bleed goes on all four edges, every time, regardless of where your design elements sit.
For a complete pre upload checklist, our print-ready files guide has everything in one place. If you need help, you can always contact us.
Does Every Print Product Need Bleed?
If your design has any color, image, or pattern that touches the edge of the finished piece, yes, you need bleed.
The only real exception is a design with a solid white background where the edge is intentionally white. Even then, setting up bleed costs you nothing and removes any risk.
A white bleed area on a white background causes no problems in production. A missing bleed on a colored background can.
For large format products like retractable banners, step and repeat backdrops, and pop up tent canopies, bleed requirements are larger than the standard 0.125 inches.
Always check the specs for the specific product before you build your file.
Ready to Order Print?
Now that your file is set up correctly, Print Cartel makes it easy to upload and order. From business cards to large format banners, we print everything with the quality and turnaround your business needs.
Contact us if you have questions about your file before you order.
Frequently Asked Questions About Print Bleed
What Is the Standard Bleed Size for Printing?
Most print products require 0.125 inches (3mm) of bleed on all four sides. Large format products like banners typically require 0.5 inches. Always check the specs for the product you are ordering.
What Happens If I Do Not Add Bleed to My File?
Without bleed, background colors or images that reach the edge of your design can show a thin strip of white paper after cutting. That gap appears because industrial cutters have a small natural variance when trimming.
Do I Need Bleed If My Design Has a White Border?
Not always, but it is still good practice. A white bleed area causes no problems in production, and it removes any risk of the cutter landing somewhere unexpected.
Can I Add Bleed After I Have Already Finished Designing?
Yes. Update your bleed settings in your design tool and extend your background to fill the new bleed area. Just updating the document settings without extending your artwork will not work.